Creation of the target VM (0 -5 %)
Preparing to the clone disk ( 5-6%)
cloning (6 -95 %)
Post-cloning (95 -97%)
Customization (97-99%)
Install tools / power on (99-100 %)
1. Agent Installation Location Locally: Install Converter and agent directly on source machine if converting directly into ESX Server Remotely: Connect to source machine over network to install agent
2. Agent Installation
- Vmware Convertor agent uses 9089 port to install the convertor agent on the target machine.
- Use local administrator account
- Avoid domain accounts that have restrictive policies
- Allow reboot for Windows NT 4.0 and 2000 sources
3. Machine Preparation
- Do not deactivate services or harden security
- Workstation service
- Server service
- TCP/IP NetBIOS Helper service
- Volume Shadow Copy service (Windows 2003 or XP)
- Ensure sufficient free disk space (at least 200MB)
- Mirrored or striped volumes across multiple disks should be broken
- Dynamic disks with utility partitions should use cold cloning
- Disable Windows Simple File Sharing (Windows XP only)
- Disable anti-virus software
- Defrag hard disks
- Shutdown any un-needed Windows Services
- Clean-up any temporary files and un-needed data
- Run chkdsk
- Keep users off if possible
- Power off VM if not using hot cloning
- VCB VM exports need editing prior to import
- Edit virtual disk filenames inside .vmx
- Rename filenames for .vmdk files to match those listed in .vmx
- Edit index .vmdk file to change references to span files
4. Network Preparation
- Open TCP/UDP ports 139, 445, and 902 (Converter 3.0.0) or 443 (Converter 3.0.1)
- Open network ports between source and destination
- Alternative is to create a VM visible to source, copy VM files to location visible to destination, and import VM Use FQDN to connect to both source and VI3
5. Converter Preparation Run on OS greater than or equal to source if source is VM and powered off, or Symantec Live state System Image
6. Cloning Starter edition limitations and workarounds
- Cannot remote hot clone directly into VI3
- Workaround 1: install Converter on source machine
- Workaround 2: select standalone VM as destination, and then import VM to VI3 using two steps
- Cannot run multiple tasks concurrently
- Workaround: run multiple copies of Converter Cannot cold clone
- Workaround: create new VM, use third-party cloning application such as Ghost, and run Converter configure
- Do not resize volume for fastest clone speed (block-level copying)
- Resize volumes if source disks have inefficient utilization (resorts to file-level copying)
- Use cold-cloning disk-based cloning (not volume-based) for non-Windows systems
- Use hot cloning for Windows NT 4.0 systems to avoid NTFS upgrade
- Destination needs to be writeable
7. Configure
- Avoid cloning utility partitions
- Check partition numbers in boot.ini
- Automatic Install VMware Tools option is only available for ESX Server VMs
8. Clean-Up Prior to Power On
- Edit VM settings according to desired goal
- Number of vCPUs
- Add/Delete USB devices
- Add/Delete Serial and parallel devices
- Remove Floppy drive if not needed
- SCSI controller type (BusLogic vs. LSI Logic)
- OEM source may require license activation
- SMBIOS.reflectHost =TRUE in .vmx may avoid reactivation
- Requires destination host to have same hardware
9. Clean-Up After Power On
- Detect hardware
- VMware Tools installation may hang if hardware not detected
- Allow reboots to occur
- Detect hardware and VMware Tools installation
- Verify HAL and change if necessary
- Remove non-present old hardware
- CMD prompt type set
- EVMGR_SHOW_NONPRESENT_DEVICES=1
- Next type DEVMGMT.MSC and select Show Hidden Devices
- Delete any old grayed out non-present hardware
- Latest version 8.0
Pre-Migration Process:-
Pre migration checks are very important steps which make sure source server is ready to be migrated
1) Check whether there is enough space in the C drive of the source server which is scheduled for migration. A minimum of 300 MB free space is required in the C drive
2) Go to My Computer ->My Network Places-> View Network Connections.
Check the NIC settings of the Primary connection
Properties--> Configure -->Advanced -->Speed and Duplex -->Check the value
If it is less than 100Mb Full, then check the NIC speed. The NIC speed should be 100Mbps or greater. This will directly affect the data copy speed while X2V conversion.
Properties ->Configure ->Driver -> Check the Driver Version
3) Go to ScheduledTasks and check if there is any Reboot scheduled for the server on Migration day.
The P2V conversion will fail if the source server reboots while the data copy is in progress. So keep in a reminder on migration day to remove the server from scheduled reboots.
4) Create an administrator account Go to My Computer ->Manage ->Local Users and Groups ->Groups
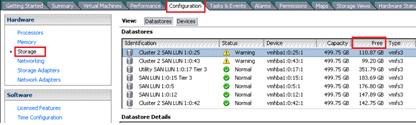
5) Check if data on any single drive is more than 256GB. If the requirement is to make the drive of size greater than 256GB then we need to use LUN of 2MB Block Size while configuring the migration job.
Login to VI Client -->Configuration--> Storage. In Data Store details we can find the Block Size of any particular LUN.

6) Also check whether there is enough free space on LUNs to accommodate all the servers which are on schedule.
Login to VI Client à Configuration à Storage. The LUN details are available here
P2V Using Vmware Convertor Tool
Select the Source physical machine which you wanna make to virtual.
Note: 1.Source Select type- must be in the Powered-on machine.
2. In the IP address or Name Field - provide a target source machine name( Physical machine name)
3. Use user account which has rights to access the convertor


Select the Destination in which you wanna place your physical machine as virtual
Note:Select Destination Type - Virtual Infrastructure virtual Machine
In the Server Field - Provide the VCenter Server Name.

Select the host in which you wanna run the Virtual machine.
Note: Select the Host.
Select the LUN which is capable to hold the size of the phyical machine. While selecting LUN keep in mind the block size of the LUN ( 1 MB- 256GB capable, 2MB - 512 GB, 4MB- 1 TB, 8MB- 2 TB) and the physical machine size.
Eg: If a physical machine size is 320 GB which i need to p2v then i have to select the LUN which is 2MB or more in block size.

If you wanna edit hard disk size, Network, Processor, Memory you can modify here.

Click finish.

Once P2V Completed. Power down the Physical machine and Power on the Vitrual machine.
Post P2V Configuration:-
After you perform a P2V of a physical computer you should consider performing the following steps in VMWare and on the Windows OS.
1) VMWare Configuration
a. Change server memory configuration
b. Change server CPU configuration
c. Configure appropriate network
d. Remove Serial and USB devices
i. Required to do migrations in an ESX cluster
e. Configure the CDRom as a Client Device and Pass-through IDE
i. Required to do migrations in an ESX cluster
2) Windows Configuration
a. Remove any hardware vendor applications
b. Remove hidden hardware
i. Commands
set devmgr_show_nonpresent_devices=1


start devmgmt.msc
view…show hidden devices
ii. Go through every hardware device and remove old hardware and hidden hardware.


iii. If unsure what something is, use good judgment, research then decide.
c. Remove or disable any unneeded services.
d. Remove any unneeded third party remote control
i. Leave on Windows 2000 / Remove on Windows 2003
e. Install / Enable Terminal Services
i. Install TS for Windows 2000
ii. Enable RDP for Windows 2003
f. Check Event log and resolve any errors
i. Some HP devices are hidden, but log errors to the event log on failure. Search HKLM\System\CurrentControlSet\Services and delete the offending service keys.
g. Remove any unneeded protocols
h. Configure Same IP Address
i. Delete application folders from uninstalls
i. Examples:
1. C:\Compaq
2. C:\HP
3. C:\Program Files\Compaq
j. Disable Windows Time Service
i. Configure VMTools to synchronize time
k. Defrag Hard Drives
Problems in P2V
Failed to install Convertor agent on the target server.
1. Check the port 9089 is opened or not.
2. Copy the VMware-Converter-Agent.exe from the vmware convertor server( By Default Location: C:\Program Files \VMware\VMware vCenter Converter Standalone) to the target server and install the agent manually.
-----------------------------------------------------------------------------
Reconfiguration Failed:-
When using Converter Standalone 4.0.1 and converting a Windows 2000 Server, the conversion may fail at 95% with one (or more) of the following errors.
A general system error occurred: InternalError, Error: Reconfiguration failed
Error 3 (error loading hive: The system cannot find the path specified (3))
Error reading boot.ini file
Error 1450 (error loading hive: Insufficient system resources exist to complete the requested service (1450)) loading temporary hive
Unable to load registry hive
Can't access guest SYSTEM registry, error 50
Cause:
The physical drives were successfully byte copied to the virtual machine, but the reconfiguration of the drives failed because the physical computer’s lack of resources (memory, CPU, network, etc).
This is a common issue on old hardware with limited memory and/or other resources, because the physical computer remotely accesses the virtual machine hard drives to perform the reconfiguration.
Solution:
Because the reconfiguration phase is separate from the cloning phase, this step can be performed by another computer running the appropriate software.
Method 1
1) Install the vConverter software to another computer (physical or virtual)
2) Click the Configure Machine button to launch the wizard
a. Machine Type
i. VMWare Infrastructure virtual machine
ii. Type the vCenter server name, username and password
iii. Click Next
b. Machine Name
i. Select the virtual machine that failed reconfiguration
ii. Click Next
c. Options
i. Select Reconfigure destination virtual machine
ii. Optional: Select Install VMWare Tools

iii. Click Next
d. Ready to Complete
i. Review summary
ii. Click Finish
Method 2
If you have the VMWare Converter Enterprise installed and enabled in your VI Client you can right click the failed virtual machine and select Reconfigure.

More Information:
A P2V is comprised of three main phases
1) Creation of the virtual machine
2) Byte cloning of the physical hard drives to the virtual machine
3) Reconfiguration of the physical hard drives to support the virtual machine.
The last phase is the most important because in this phase the information in the hard drives is edited to allow the VM to boot and load the proper drivers (SCSI, Video, Network, etc). If a failure occurs during the last stage the virtual machine can be reconfigured from any other computer.
No comments:
Post a Comment